Hey Remodelaholics! It’s Shara here from Woodshop Diaries and I’m so excited to show you how to make this adorable DIY rocking horse…that’s actually a rocking toy DOG!

Isn’t it cute?? It’s the perfect size for a small toddler, but could be made larger for older children. It would also be really cute as decoration or around the Christmas tree (although I’m a little late for that haha).

So, let’s get started building!
Handmade Wooden Rocking Toy Dog Tutorial
Tools and Materials:
- 1x6x8’ board
- 2×4 sheet of ¾” plywood
- 1 ½”dowel rod
- Jig Saw
- Belt Sander (optional but helpful)
- Router and 3/4″ straight bit OR table saw (optional but helpful)
- Orbital Sander
- Miter Saw
- Clamps
- Nail Gun
- Drill
- 1 ½” hole saw
- Measuring tape
- Wood Glue
- 1 ¼” wood screws
- 2 ½” wood screws
Step 1: Build the Rocker
First, cut a piece of 1×6 board at 26” long. (In my photos and video, you will notice the board I’m using is wider than 1×6. I used a scrap piece of 1×12, but if you are purchasing lumber to build this, a 1×6 should be plenty and will save you some money as opposed to buying a 1×12.)
Use a thin piece of scrap wood or a large round object to draw a curve along the board so that each end is 1 ½” from the bottom. I found it easiest to drive a screw 1 1/2” from the bottom of the board on each end and one at the bottom in the center, then wrap a thin piece of scrap wood around it to draw the line. When you have that one drawn, you can move it up another 1 ½” and draw again. This gives you a curve shape 1 ½” thick.

Using a jig saw, cut out this curve, then trace around it and cut another one so that you have two. You can choose to round the corners using a jig saw or belt sander, or leave them. Also, it’s helpful to use a belt sander (if you have one) to smooth out the bottom of the rockers so they are even.


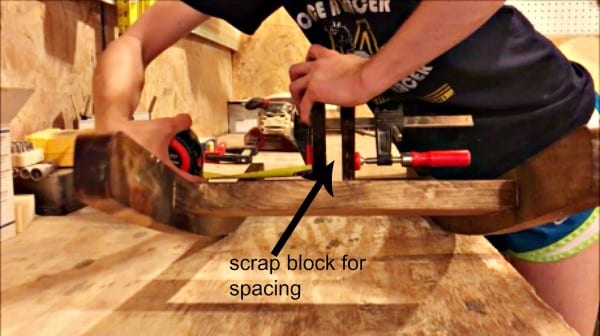
Then, cut a piece of 1×6 board about 12” long. Use a miter saw or a table saw to CAREFULLY cut this piece in half so that each piece is about 2 ¾” wide. If you wish, you can just cut two 1×6 pieces 12” long instead. These will be the braces between the rockers, so it really doesn’t matter if you choose to leave them a little wider than I did.
Using wood glue and 1 ¼” wood screws, attach these pieces between the two rockers like shown below. Attach the braces about 6” from the end of each rocker.

Step 2: Cut the Rocking Toy Dog Shapes
You can find a template here for the rocking dog shapes. You will need one body, two ears, two front and two back legs. You will have to tape the body pieces together once you print it out to get the whole shape since it’s large.
Trace these shapes onto the plywood and remaining 1×6 board. Use a jig saw to cut out all the shapes.


Step 3: Finish before assembling
Sand all your pieces nice and smooth. It’s easiest to go ahead and stain or paint now before you assemble. I stained my dog pieces and rocker in Minwax Dark Walnut, but you can paint or stain in whatever color you wish.

Step 4: Assemble the rocking toy dog
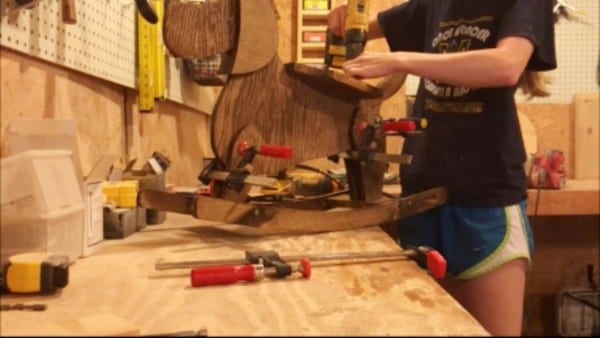
The body of the rocking dog will set between the legs, so I took a scrap piece of plywood and sandwiched between each set (front and back) of legs, centered them on the braces of the rocker base and screwed in with 1 ¼” wood screws.

Remove the scrap piece of plywood, then you can slide the dog body in place in just a few minutes.

Before adding the dog body to the legs, use some wood glue and a nail gun to attach the ear pieces to the head.

Then, glue the area on the body where the legs will go and slide the dog body in place between each set of legs. Clamp everything together and use a nail gun or some wood screws to hold it in place. It’s helpful to prop the dog up sideways like shown when gluing and clamping it all together.


Step 5: Add the seat
Use a scrap piece of 1×8 or plywood to make the seat. Cut it about 10″ long and about 7″ wide. Using either a table saw or a router, cut a 3/4″ wide dado about 1/4″ deep through the middle of the bottom of the seat. This is to help it sit better in place on the dog back. This step is optional, but will help if your back isn’t 100% straight from the jig saw cuts.

Use a jig saw to curve out the front of the seat if desired. Also, sand down sharp edges so they are slightly rounded.

Stain or paint the seat. Then, add some glue in the dado groove, set in place and use 1 1/4″ wood screws to hold in place.
Step 6: Add the handle bar
Once the glue is dry on the legs, ears, and body, use a drill and a 1 ½” hole saw to drill a hole through the ears and head of the toy dog. Add some glue in the hole and slide in a 12” long piece of 1 ½” dowel rod. To help hold it in place while the glue dries, shoot a few nails through the front of the toy dog ear.


Now, just add some poly or clear coat and you are good to go!


How cute, right??


More handmade toys your kids will love:

YARDZEE yard dice game + printable scorecard
upcycled sink into sand and water table


The post A Classic Rocking Horse Twist: DIY Wooden Rocking Toy Dog appeared first on Remodelaholic.
https://www.remodelaholic.com/diy-wooden-rocking-toy-dog/
No comments:
Post a Comment