Hello Remodaholic readers! It’s Mindi from MyLove2Create!
Last time I shared my
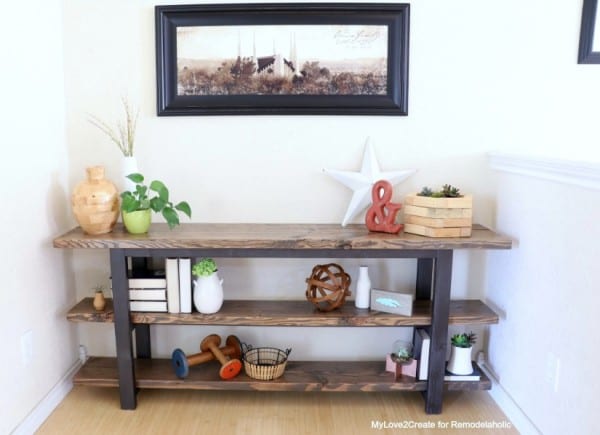
Long Hexagon Tray with you, today I am going to show you how to build pottery barn inspired modern rustic console table!
Isn’t it a beauty!!
You can have the high end look without the cost with this easy build, and I am super excited to show you how! Watch the video
over on the Remodelaholic YouTube channel here (and please subscribe!), and read below for the photo tutorial and printable building plan.
How to Build a Modern Rustic Console Table
Click here to get the building plan over at Mylove2Create
This post contains affiliate links for your shopping convenience. Learn more and read our full disclosure policy here.
Supply List
- 2- 2’’ x 2’’ x 8’ boards (actual- 1 1/2’’ x 1 1/2’’ x 96’’)
- 2- 2’’ x 3’’ x 8’ boards (actual-1 1/2’’ x 2 1/2’’ x 96’’)
- 1- 2” x 6’’ x 8’ board (actual-1 1/2’’ x 5 1/2’’ x 96’’)
- 3- 2’’ x 10’’ x 8’ boards (actual- 1 1/2’’ x 9 1/4’’ x 96’’)
- Miter saw or circular saw
- pocket hole jig
- wood glue
- 2 1/2” wood screws or self tapping screws
- 1 1/2” pocket hole screws
- tape measure
- clamps
- sand paper/sander
- drill
- desired finishing supplies
Cut List:
- 4- 2×2’s @ 47 3/4’’ (aprons/supports)
- 4- 2×3’s @ 27 1/2’’ (legs)
- 7- 2×3’s @ 9 3/4’’ (6 side rails and 1 middle top support)
- 1- 2×6 @ 70’’ (top)
- 3- 2×10’s @ 70’’ (shelfs and top)
Step 1: Cut wood
Cut all wood to size using the cut list above. For multiple cuts use your first cut piece to measure, mark and cut the remaining pieces of the same size (bottom left).
Step 2: Drill Pocket holes
Using a pocket hole jig, drill 1 1/2” pocket holes into each end of your 4-2×2 apron supports and your 6 rails and 1 middle support pieces.
Step 3: Sand your pieces
Once the pocket holes are drilled your are ready to build, but I suggest sanding all your pieces beforehand. I started with 100 grit sand paper and then finished off with 220 grit.
Ok, Now it is time to build! Yay!
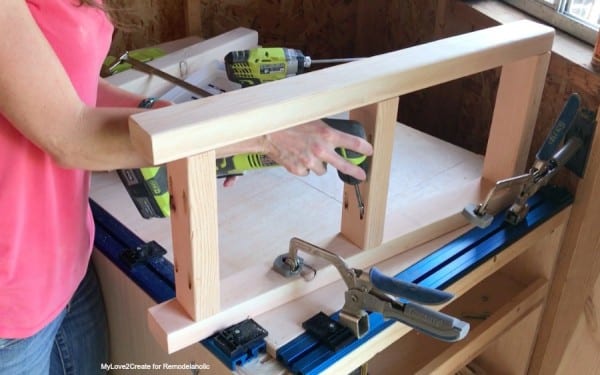
Attach your 2×3 legs and rails with wood glue and clamp the pieces pieces before drilling in your 2 1/2” pocket hole screws. I started by attaching the top rail…
Then I screwed on the bottom rail. You can see I have used scrap wood as spacers between my rails. This is optional, but since I had the scrap pieces it was easy to cut them to size instead of measuring and marking the legs for the rail spacing. Either way will work, I am just lazy and this way is less work!
To attach my middle rail I used a right angle drill for adding my screws since it is a tight fit with a regular drill and long bit. Because I had glued and clamped this board while attaching the top and bottom rails, the glue had set well enough that I didn’t need to clamp while I added my screws.
Step 5: Attach aprons and supports to sides
With your two sides built now you are ready to attach your apron pieces and support pieces to connect them together.
Glue and clamp your aprons to the top of your side pieces. I like to use a right angle clamp to hold my pieces in places so they don’t shift while I drive in the screw.
I added my first apron (top) and then my second (bottom). I attached them two different ways, but either one will work. I think the bottom photo was the easier method. The pocket holes will not be seen no matter which method you choose.
Measure and mark the center of your 2×3 middle and bottom rails for where you need to attach the support boards. Then glue and clamp the supports to the rails and add your 2 1/2” pocket hole screws.
Step 6: Finish as desired
Now you may think, “Finish? But the build isn’t complete yet!” You are right, but trust me this is the best way to do it!
I did a quick dry fit with my top and shelf boards to make sure everything fit and was square. Then I spray painted the base of the console table with oil rubbed bronze to give it a metallic look.
I wanted my new wood to have a more “weathered” look so I did a few extra steps instead of just staining like normal. Because I was using soft pine I used a Pre wood conditioner to keep my stain from going on blotchy (top left).
I started with a coat of weathered gray stain (top right). Once that dried I took some random objects and did some banging with a hammer, pounding random things into the wood (like this beaded cord, bottom left and a screw), and used a chisel to scrap and gouge some edges. I show a few more examples of how to get the reclaimed wood look in my
Reclaimed Wood Coffee Table post.
I stained the wood again with a dark walnut. The darker stain on top helped the “banged up” parts to stand out more giving the wood that used and reclaimed look.
I finished off the top board and shelves with 3 coats of poly sanding with a fine grit sand paper between coats 2 and 3.
Step 7: Attach the top board and shelves
When I got to this step I realized that I needed a top support board to help support the weight of the top boards in the center (top left) you can add this after step 5. This is especially important if you are using this as a media console and will be placing a heavy TV on top.
Then I centered the base on the bottom of the top boards (1 2×6 board and 1 2×10 board) and screwed the base into the top boards from underneath. In the top right photo you can see I used another scrap board cut to size to ensure the edges of the top and shelves would stick off the edge at the correct distance.
Make sure to screw into both top boards through the rails and the aprons using 2 1/2” screws. If your screws are not self tapping you will need to pre-drill before you add your screws so you don’t split the wood. I used self tapping screws since I had them on hand. They make me happy!

The easiest way to add the shelves is to turn the console on it’s side. Since the shelves are 1/2” less wide then the rails you will need 1/4” on each side between the legs. I used 5 gallon paint stick scraps, which are 1/4” thick, to set my shelf boards on so they were in the correct place.
Then I attached them through the bottom of the rails and supports with 2 1/2” self tapping screws, and that is it!!
You just built a beautiful console table for a fraction of the inspired version’s cost!!
Plus this is a really quick build, so it doesn’t take long at all! I bought the wood and had it built before my kids got home from school. Technically I hadn’t attached the top and shelf boards yet, but the base was built and spray painted!
This is such a versatile piece too. I can be used behind a sofa, for your TV and media, or as an entry table.
I think it would be great in a craft room too with labeled bins to hold craft supplies, or fabric!
Or to hold your books, plants and decor! You can see one of my
DIY Hexagon Planters on the top right, it is a perfect accent for a table like this.
You can finish it with a rustic industrial look like I did here or on my
Rustic Industrial Table, or use a fun colored paint and stain…really there are so many possibilities to make it to fit your own style.
This is why I love DIY…
Make it how you want it!
If you are looking for a console table I hope you give this build a try!
You won’t regret it, please visit me on my blog for more great DIY and craft projects for your home!
Hugs!
Mindi
More DIY console tables to build:
planked X farmhouse console
adjustable length double X console
https://www.remodelaholic.com/build-no-nails-console-table/ no-nails extra long console table
waterfall edge stacked plywood console table
sliding barn door console

The post Pottery Barn Inspired Modern Rustic Console Table appeared first on Remodelaholic.
https://www.remodelaholic.com/modern-rustic-console-table-pottery-barn-inspired/


No comments:
Post a Comment